LEAKS
Surface leaks are encountered on many grouting jobs. Gear for dealing with them should always be available.
Leaks to underground openings such as tunnels, drives, and shafts are treated similarly to surface leaks. Note the distinction between these and leaks to other grout holes, called connections and handled differently
Surface leaks emerge in situations such as the following:
- Distinct cracks coming to the surface.
- Indistinct cracks among weak rock and weathered materials.
- Among groups of countless fine cracks.
- Where weathered materials or soft rock have been dislodged by the grout.
- Where rock has been moved by grout pressure.
- Where concrete structures such as slabs or grout caps have been inappropriately placed.
- The most inconvenient places possible in accordance with Murphy's law!
Treatment to stop leaks varies depending on the nature of the leaks. Descriptions follow, starting with caulking and proceeding to situations where caulking is useless.
Using Caulking to Stop Leaks:-
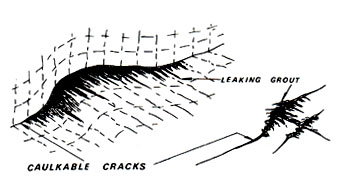
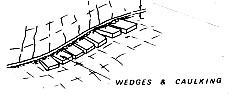
If leaks are coming out cracks with firm edges, and are accessible and not numerous, as shown in the sketch, caulking is the best treatment
.
Caulking is the process of driving soft material into the cracks, together with wedges in those parts of cracks that are wide enough for them.
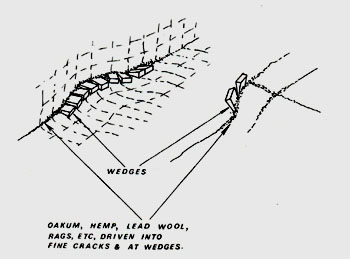
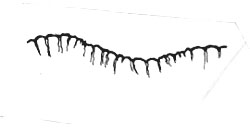
The cracks in the sketch above will appear as in this sketch after they have been caulked.
Cases Where Caulking Is Unsuitable:-

Caulking is not practical in the following circumstances:
- Leaks are coming from cracks with soft or weak edges where wedges and caulking will not hold.
- Too many cracks are simultaneously leaking to be able to caulk them individually.
- The leaks are not accessible.
- Insufficient people are available to caulk the leaks within about half an hour from break-out.
Some examples are shown in the sketch above.
HOW TO CAULK CRACKS
- 1. Use the control valve on the standpipe to reduce the pressure to a low amount such as 15 psi [1 bar] and to reduce the volume of grout entering the hole to a trickle - not much more than is needed to keep the supply up to any cracks that are not leaking and are able to accept grout at this reduced pressure and to compensate for bleeding losses.
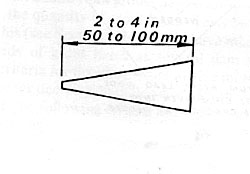
- 2. If the cracks are wide enough for wedges, use ones with a slow taper and slightly blunt end, as shown in sketch at left. Wedges can be cut from hardwood, but softwood such as Douglas fir (Oregon) is better because of slight swelling when the wedges become wet in the cracks.
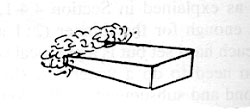
Wrap the nose of wedges with soft bulky material such as oakum, hemp, burlap, or rags. .

Where wedges will fit into cracks, place them closely side by side. The gaps between them must be bridged by the soft material overlapping.
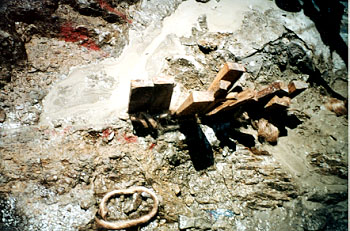
A typical higgly-piggly run of wedges and oakum driven into a caulked crack.
If cracks are too fine for wedges, drive the soft material in with caulking tools of the type boatbuilders use (blunt steel chisels of various sizes and shapes).
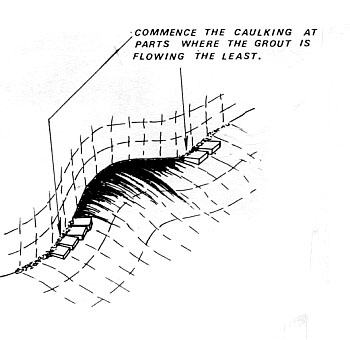
Commence caulking where the grout flow is the weakest. The sketch shows a crack partly caulked in this manner.
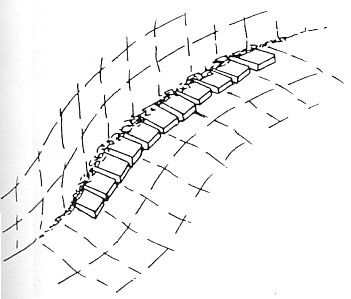
- 3. When the caulking has been completed along all but the last foot or so, turn off injection completely and then complete the remaining caulking as shown in this sketch.
- 4. If the crack is horizontal or slopes downhill to the caulking and is therefore difficult to vent by means of seeps through the caulking, caulk a short vent pipe into it with a valve on top. This valve is left open until the caulking is able to withstand some grout pressure and is then (later) closed when thin grout and water cease to come out.
- 5. The crack is now ready for grouting to resume. Thicken the mix to 1:1 and inject this for a few minutes to test the caulking and to feed thick grout up to it. Tighten any caulking leaking appreciably, but don't worry about mere seeps.
- 6. Thicken further to 0.8:1 and inject cautiously at low pressure to get this thick grout up to the caulking.
- 7. In difficult cases, further thickening of the grout may be necessary, with the grout injected intermittently.
- 8. Note that the leaks are stopped mainly by the stiff grout next to the caulking and not so much by the caulking itself.
- 9. Once the leaks are stopped, it should be possible to continue the grout application to refusal as usual, but with caution and without thinning the mix.
- 10. Because this treatment has probably plugged off the entrances to any fine cracks leading off the hole, it is usually desirable to give further applications of grout in the hole, or to drill and grout additional holes nearby.
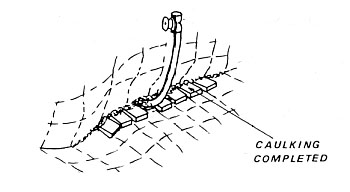
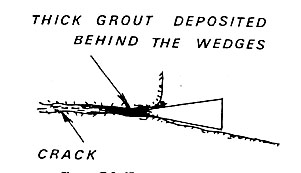
Let excess water seep out of the caulking or bleed it off through a vent pipe. The aim is to achieve the situation shown in the sketch.
It can be helpful to stop grouting for a few minutes so that the stationary grout can develop thixotropic stiffening and so lose its fluid properties.
SOME EXAMPLES
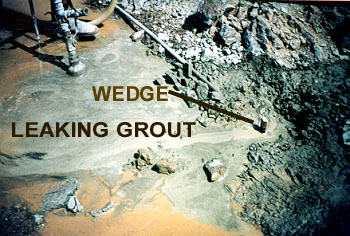
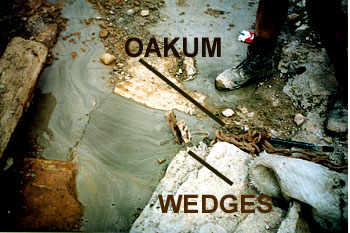
Photo of the first wedge in a surface crack. It has not stopped the flow of grout; much of the photo to the left of the wedge shows this leaking grout. The leak has broken out underneath a mound of loose excavation material; a shovel has been used to clear the area at the leak, but more clearing will be necessary along the leaking crack. The moral here is that a wide area around grout holes should be cleared before grouting to enable quick access to leaks.
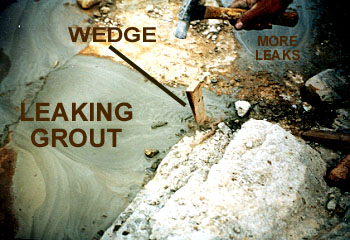
Caulking of another surface leak is shown in this photo and the following two. The first wedge is being driven into the location of the initial leakage.
The leak is continuing strongly. Another wedge has been placed. It will obviously be necessary to chase the crack sideways with more caulking.
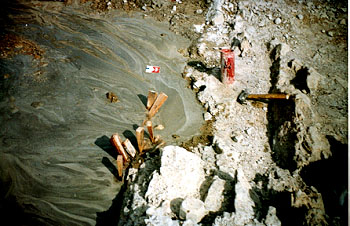
Additional wedges have been hammered into the leaking crack. The leak has diminished but more caulking will be needed before it is beaten.
CAUTIONS ABOUT CAULKING
If a caulked crack opens up uniformly as shown in this sketch, it means that rock has moved after the caulking. Special treatment is needed to handle rock movements as outlined lower on this page.
Always have sufficient caulking supplies on hand. They may be needed without warning.

Caulking a firm crack with lead wool. This is in a foundation gallery of a dam.
For a description of the manner in which caulking or wedges stop leaks, refer to the Guide
HOW TO STOP LEAKS WHERE CAULKING CAN'T BE USED
BEST METHOD
Place a coating on the foundation surface to cover all of the leaking area. This binds surface chunks together and stops the surface unravelling during the grouting and is quite effective, to the surprise of people who have not previously seen it used. The flimsy-looking thin coating is able to hold against normal grout pressures as long as it remains integral.
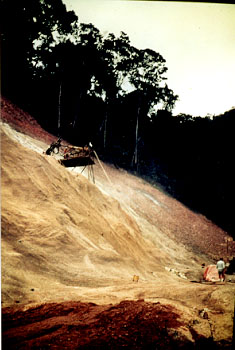
The surface coating is made with slush grout, gunite, pneumatically applied mortar or similar, to produce a relatively flexible coat about an eighth to a quarter inch thick (3 to 6 mm).
This photo and the next one below show an application of this method at a dam site where tropical weathering produced myriads of surface cracks. Individual treatment of them was impractical.
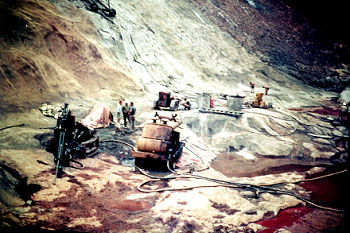
The very big disadvantage of this type of treatment is that it has to be placed several days before the grouting to give the coating time to set, and it is therefore unsuitable when immediate treatment is needed. This is where experience is needed to anticipate where leaks can be expected and thus treat the area in advance.
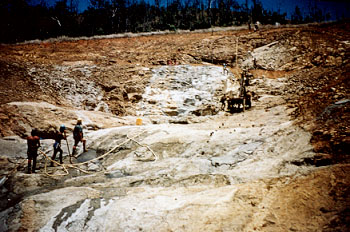
On some sites where extensive areas have been expected to prevent this type of leakage problem, most or all of the site has been covered in this manner. Such treatment is also beneficial as surface preparation for the core foundation of some embankment dams as in this photo. The grout curtain follows the line of the standpipes; slush grouting has not been confined to the grouting area but extends over the width of the core.
NEXT BEST METHOD
Note that this method and the next one are not as good as the previous one, nor as caulking is, for producing good grouting: they are very much "also ran" solutions, and the grouting can suffer in quality. However, at times they are unavoidable; afterwards further applications and extra holes should be grouted to deal with deficiencies incurred in the leak-stopping process.
PONDING ON THE SURFACE
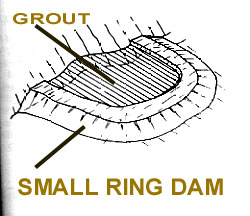
A small ring dam is made by shovelling clay or any suitable available rubbish. The dam encases the leaking area. The leaking grout is allowed to build up in it to form a small pond and then injection is stopped or slowed to allow the grout in it to stiffen. Later, injection starts again, very cautiously, using thick grout.
LAST RESORT
Internal Blocking
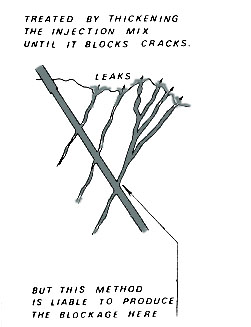
This method blocks the cracks underground by using a very thick mix which, while blocking off the leaking cracks not only neglects non-leaking finer cracks and may leave them ungrouted, but the underground blockages in the leaking cracks may be only temporary and can be liable to leak once more when pressure is resumed. Grouting programmes can be severely disrupted when one must resort to this method.
CONNECTIONS BETWEEN GROUT HOLES
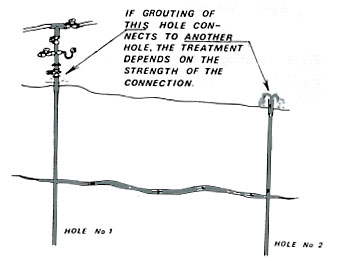
Grout connections between grout holes are usually a nuisance. Some idea that such connections are going to happen usually comes from the water test before grouting, and this gives time to think about what to do. Strong connections can substantially affect the grouting and require special treatment.
Treatment methods vary with the strength of the connection. The strength can be decided from the water test or from grout emerging from holes, as shown in the sketch.
To decide what to do if grouting is in progress and an unexpected connection starts, examine what is coming out of the hole:
- If water or air is emerging but no grout, then the connection might take up of its own accord without any special measures.
- If grout is emerging but the flow is only a trickle and is thinner than the mix being injected, then this indicates that the connection is slight.
- If grout is strongly emerging, then the connection is strong.
TREATING WEAK CONNECTIONS
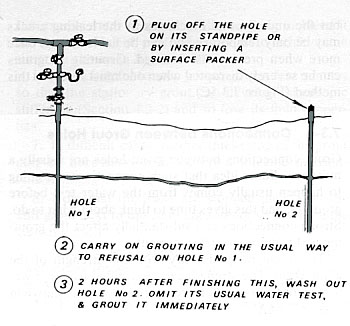
This is the treatment method for weak connections.
TREATING STRONG CONNECTIONS
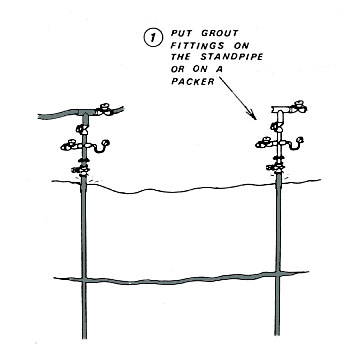
This is the first step in preparing to grout both holes together because the connection is too strong for them to be grouted separately.
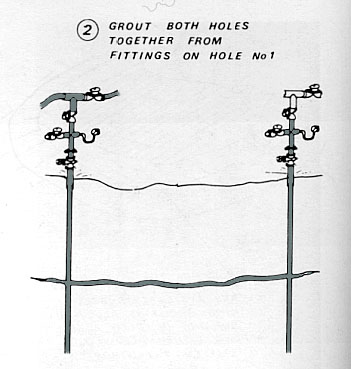
Grouting the left hand hole then supplies grout for both holes.
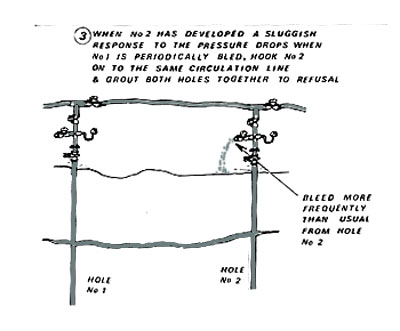
However, because the connection is not necessarily a clear path for passing good grout to the second hole, good practice is to hook on to the second hole eventually and grout it in the normal manner.
Finer cracks leading off from the second hole have not necessarily had proper grouting treatment, so it is advisable to later put holes through the path of the connection to remedy this and check that the connection has indeed been sealed.
When grouting is being done by closure methods, if connections occur past holes grouted in an earlier step of closure, poor grouting is indicated. The cause should be sought and improvements implemented. This is one of the ways for finding faulty grouting.
HOW TO GROUT STRESSED ROCK, and MOVING ROCK
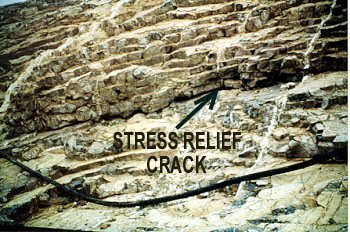
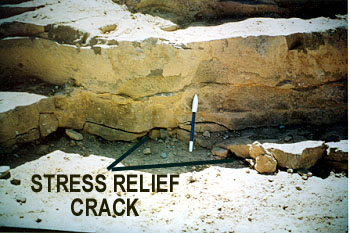
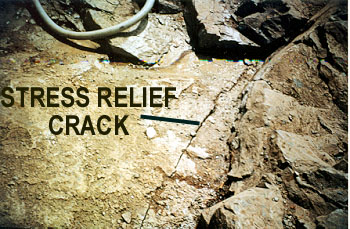
An example of a stress relief crack formed as the result of removal of the weight of overlying foundation material. This crack extended deeply into the rock mass. For scale compare it with the grout hose in the foreground.
This section deals with the grouting of rock in such situations. It also deals with movements of unstressed rock during grouting.
For a list of indicatiors of the presence of stressed rock, see the GEOLOGY page.
Rock Movements
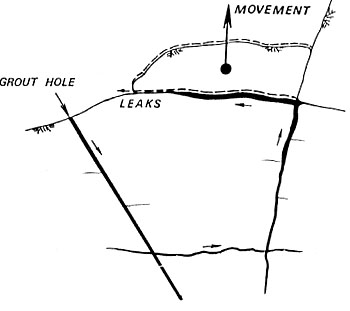
INDICATIONS WHEN DOING GROUTING
When grouting a hole, the following signs indicate that rock has probably moved:
- A sudden increase in grout take for no apparent reason
- Sudden loss of pressure in the hole.
If rock moves while it is being grouted, a change in procedures may be necessary.
Movements can be from several causes. Before going on to those resulting from rock stress, consider the examples in the next three sketches unrelated to stress.
This is a typical surface rock of the type that can be moved by grouting if not adequately gripped by the general rock mass. Relatively thin horizontal slabs are particularly prone to this; they might have insufficient cantilever or beam strength or perhaps are detached from the body of the rock by jointing.
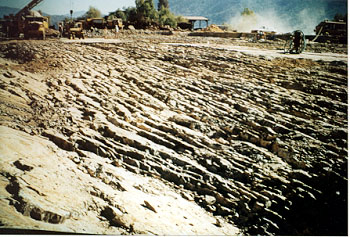
The photo shows a foundation of this type. These thin layers of rock are easily moved by grout.
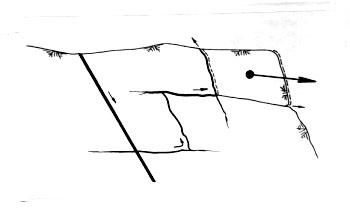
A slightly different situation is shown here where a detached block adjoins a face and sits on downward-sloping jointing. Surface leaks can be expected - if not before the movement, then certainly after it. Of course, blocks as bad as this should have been removed before grouting, but the situation is not always as clear-cut as the one shown.
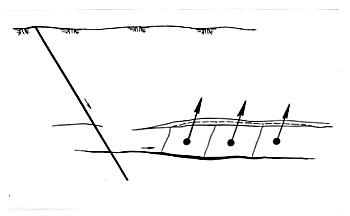
Underground movement of the type shown has been known to happen occasionally. Wide joint openings between horizontal beds can permit rock to be moved into some if grout gets into only a few of the others. In this situation, instead of having more or less uniform pressure distributions in all joints, the uneven pressurisation moves rock into the low-pressure regions. Local rupturing of jointing can be expected to follow, allowing grout to then pass through into the low-pressure regions and equalise pressures.
It could be said that this sort of movement does not matter, and in fact helps the grout to get into otherwise inaccessible cracks, on somewhat the same philosophy as the use of very high pressures to deliberately rupture jointing, as discussed in the Guide. This type of movement is usually associated with widespread occurrence of well-open joints, which permit easy grout penetration far beyond the desired area of grouting and where it is necessary to curb grout takes.
Grout operators should watch for these signs at all times, even on sites where movement is not particularly likely, and should always start each application at low pressure as recommended. Normal pressure is then only applied if there are no problems.
If the signs of movement occur, the main control valve should be closed immediately while the cause is given some consideration. If the movement is in unstressed rock, there will probably be some telltale surface leaks indicating the site of the offending rock. In severe cases it may need to be anchored by bolting; in less severe cases, surface leak treatment may suffice to get refusal. When grouting resumes, it should be done generally as described below for stressed rock.
Some organisations insist that only very experienced operators handle the grouting of moving rock because of the high level of skill required.
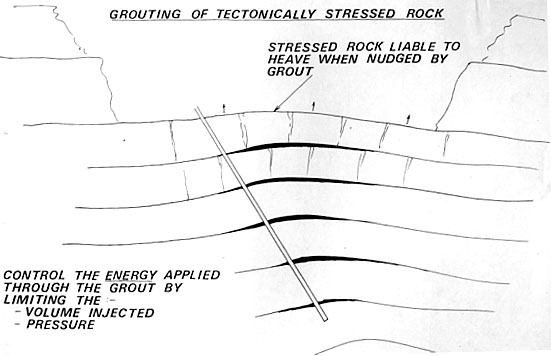
When a site obviously has stressed rock, designs and specifications for its grouting should make provision for the special methods. Some of the beds may have almost reached the limit of their capacity to carry their stresses and only need the nudge provided by grouting to fail, probably by upwards heave in the case of the valley floor, as shown in the sketch.
THE KEY TO SUCCESSFUL GROUTING IN SUCH CASES IS TO LIMIT THE ENERGY APPLIED THROUGH THE GROUT BY LIMITING THE VOLUME AND PRESSURE.
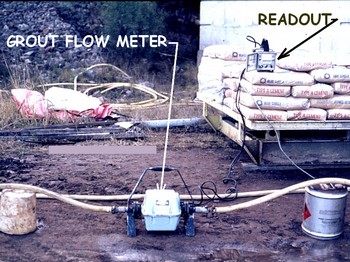
When multiplied together, volume and pressure can be loosely regarded as a measure of the ENERGY applied. Control is not just a matter of keeping the pressure low. The idea is to limit the energy supplied to an amount that does not precipitate stress relief or movement, This amount is found by experience on the basis that the rate of take should be restricted to the volume needed to fill the voids initially open, plus that subsequently required to compensate for leakage and bleeding losses. A grout flow meter gives continuous and accurate control of the volume and is essential in delicate situations.
Pressures should be kept as low as practicable, short of stopping the grout flow: 5 or 10 psi [0. 3 or 0.6 bar] is the order of things for movements near the surface. Intermittent grouting may be helpful in bad cases: the grout is turned on for a few minutes and then off for the next few minutes, and so on. This gets the benefit of thixotropic stiffening during the off periods.
Grout should be the thickest possible: w:c = 0.6:1 or 0.5:1 is advisable, and grouting should be taken to refusal unless there is no sign of approaching it after several hours' grouting.
Successive daily applications of grout may be needed in the initial holes in order to tighten an area sufficiently for ordinary grouting (with continued care, of course) to follow, for finishing the job properly. These successive applications compensate for volume lost by bleeding, for limitations on the volume injected, and for the effects of some stressed slabs that creep for hours after grouting and open up again later on the grouted cracks.
Grouting of stressed sites is necessarily a slow and careful job taking possibly twice as many holes as unstressed sites and costing more than this proportionally. Great patience is required!
lnstrumentation to Detect Movements During Grouting
Various ingenious arrangements have been devised to detect movement of surface rock. They range from the simple to the exotic. The simplest is a vertical rod, typically 30 ft [10 m] long, anchored at its base to deep beds; any uplift of the surface relative to its top can then be measured. Measuring has been done manually or with electronic warning devices of various sorts.
Sophisticated instrumentation such as acoustic emission detection represents the other end of the range. Considerable expertise is necessary with this method to enable separation of surface movement noises from others occasioned by grout travel in cracks.
Some jobs have tried survey methods, using a precise level (the ordinary dumpy level is not accurate enough) and stations embedded in the surface. However, reading is so slow that unless continuously taken ,in a very limited area, uplift is not detected until too late.
A great deal of money has been spent putting gauges in likely places on a number of sites, but rarely the expenditure been justified. Often the uplift has been in an adjoining slab - not in one with a gauge! Many disappointments like this have led me to now omit instrumentation for the detection of uplift. Instead, a much surer and cheaper detection method is to pass all grout through a flow meter; this indicates sudden increases in flow and can be arranged, if desired, to sound an alarm. Where electronic monitoring of pressures is in use, alarms can similarly be arranged for sudden loss of pressure indicating movement in the foundation.
Here is a suggestion: If you have reached this page without seeing the "HOME" page then go there to get access to the various programmes listed there.